ExFlow User
Go to: ExFlow Users
To be able to log in to ExFlow Web, "ExFlow Users" need to be created. Adding a new ExFlow user will automatically create an Approval Group with the same name.
Create new ExFlow Users
ExFlow Users can be created via Get Started Wizard, Export/Import, or manually via Excel Import or by creating a new ExFlow User Card.
Import ExFlow Users from Excel
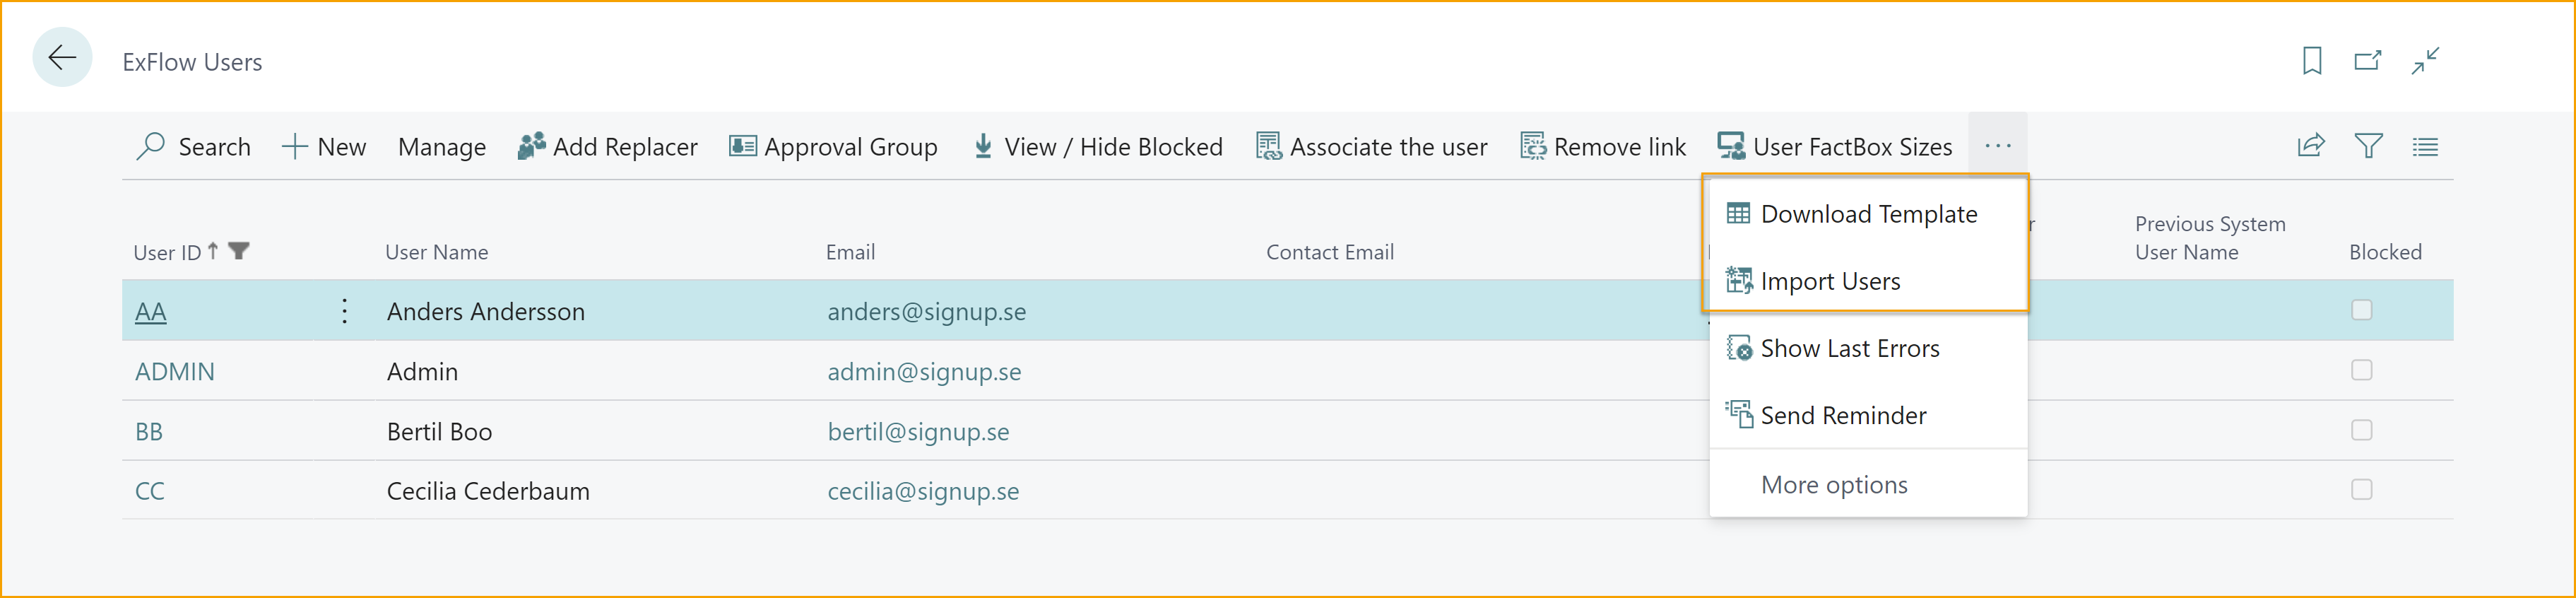
Go to: ExFlow Setup - Overview --> ExFlow Users
Begin by pressing on ''Download Template'' to get the Excel Template.
Enter all information regarding ExFlow users and (ExFlow) User Permissions. Save the Excel file and import it via function "Import Users".
Add a New User manually
Go To: ExFlow Setup - Overview --> ExFlow Users --> New
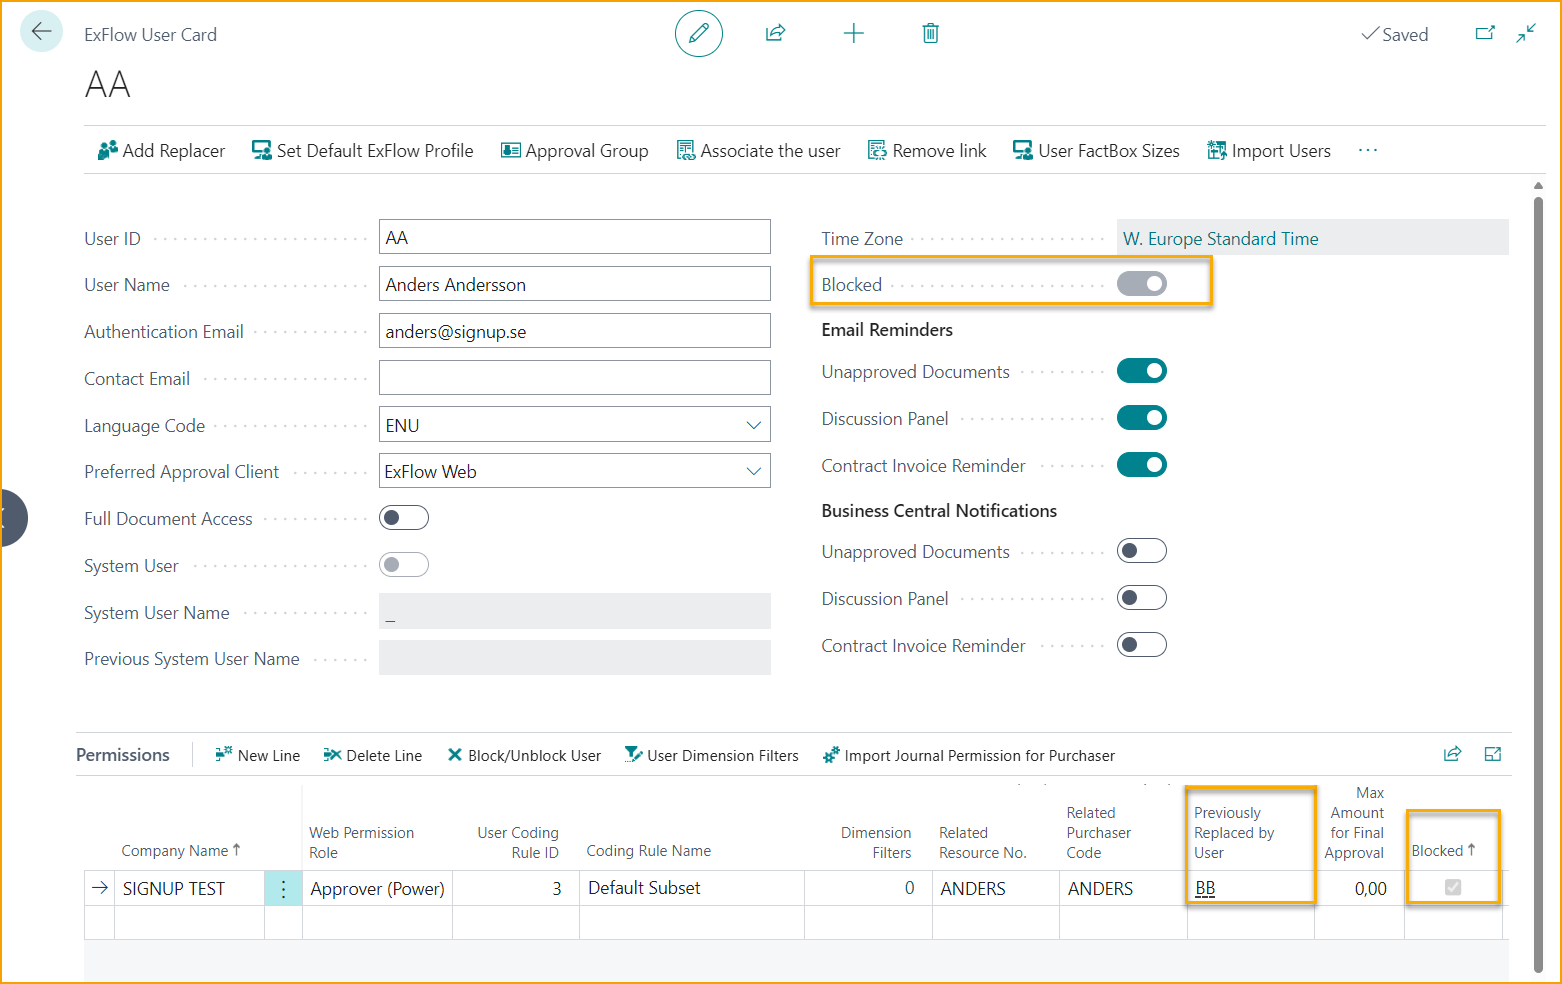
Enter all needed information about the new ExFlow User, the mandatory fields are star marked:
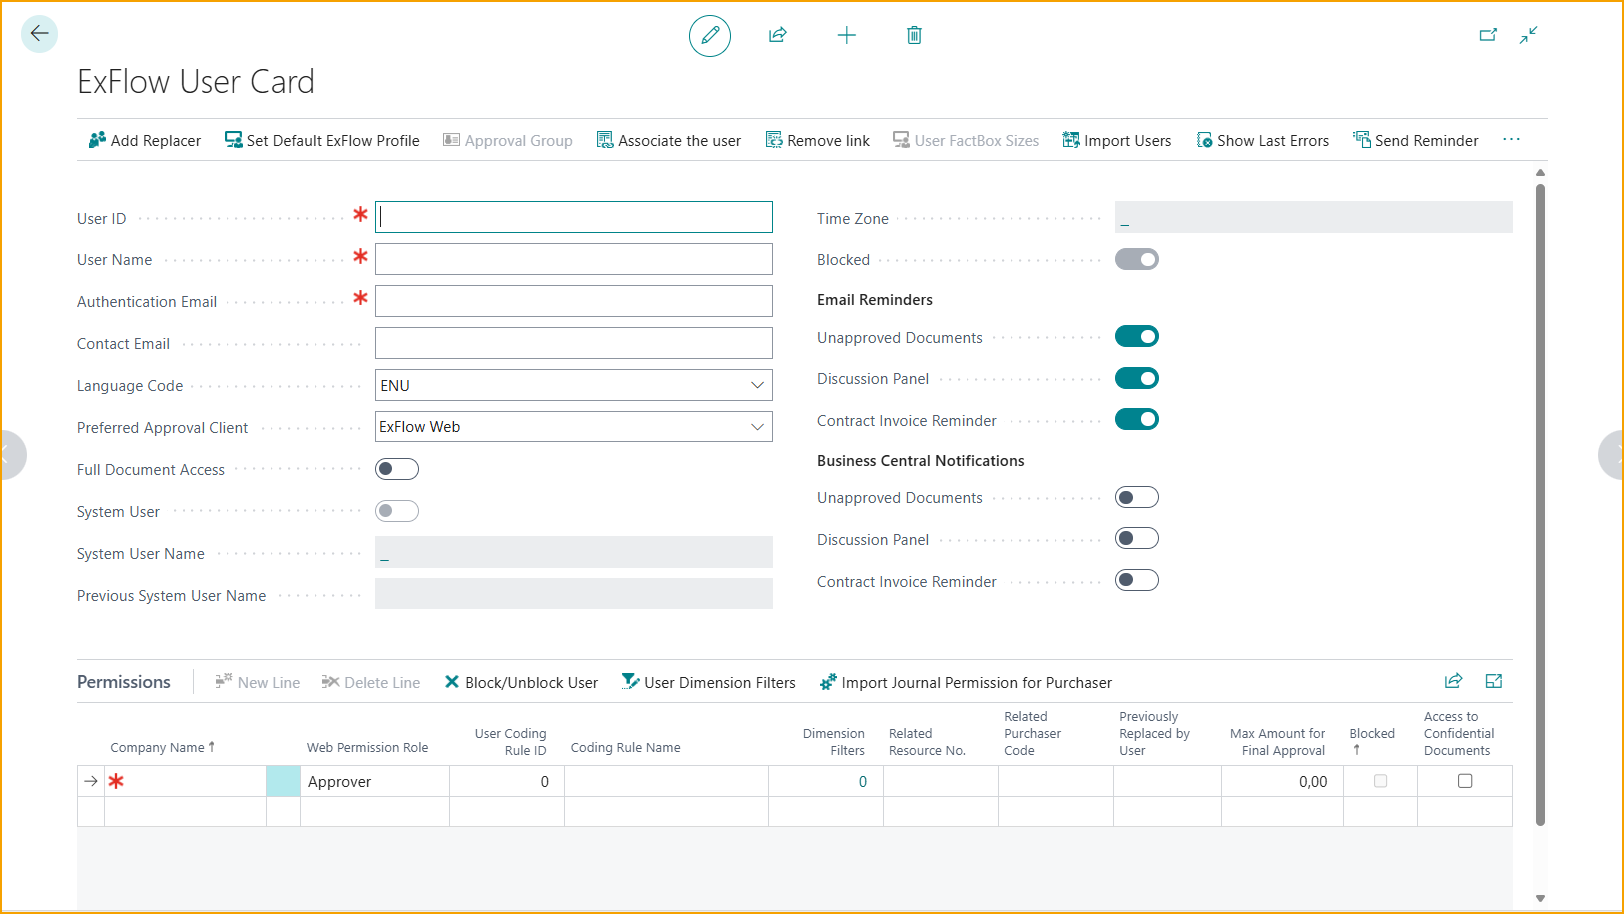
The ExFlow user will be marked as ''Blocked'', until all star marked fields are added.
ExFlow User Card - Menu
| ExFlow Menu | |
|---|---|
| Add Replacer | Add a replacer, when needed, to the ExFlow user. Read more about this here |
| Set Default ExFlow Profile | Set ExFlow as Default Role Center for the associated Business Central user. |
| Approval Group | Read more about this here |
| Associate the user | Associate the ExFlow User with an System User. Read more about this here |
| Remove link | Remove the associated link between the ExFlow User and System User. |
| User FactBox Sizes | Set an ExFlow user default settings for the FactBox Sizes. Read more about this here |
| Import Users | Import ExFlow users. Read more under Create new ExFlow Users |
| Show Last Errors | Shows if there are any Configuration Packages error for the ExFlow Data package when using ''Import (ExFlow) Users'' Excel file. |
| Send Reminder | Send reminder to the specific ExFlow User. Read more about this here |
| Actions | |
| Create ExFlow Reference | Creates an ExFlow Reference for the specific ExFlow User Name. Read more about ExFlow Reference |
| Actions --> Other | (same buttons as under ExFlow Menu) |
General Fields
| ExFlow User Card | |
|---|---|
| User ID: | Add User ID without Domain |
| User Name: | Add Approvers' full names |
| Authentication Email | Microsoft Authentication (AAD) email address that ExFlow will use for login to ExFlow Web and for communication with approvers, i.e., send reminders if approver have documents to approve and ExFlow Comments from Discussion Panel/Chat. This email is picked up from Business Central system user during creation of ExFlow user (Contact Email will also be populated with same email address). All ExFlow Users must have an Authentication Email. |
| Contact Email: | Add a Contact Email if ExFlow reminders and notifications should be sent to this email instead of the Authentication Email address. Contact Email is an optional field. |
| Language Code: | In which language emails will be sent |
| Preferred Approval Client: | Specifies if the hyperlink in the emails for Reminders and Messages will take the user to Business Central or ExFlow Web |
| Full Document Access: | Specifies if the user should have access to ExFlow documents in all companies, when running ExFlow report Approval Follow-Up |
| System User: | Specifies if the ExFlow user also is a valid system user. |
| System User Name: | Connected System User. |
| Previous System User Name: | If connected System User is changed, this field will show previous value |
| Time Zone: | Shows the time zone of the user to present timestamp in the local time |
| Blocked: | This will show if Approver is blocked in all companies Read more under section Approver Leaving the Company. |
Email Reminders
| Email Reminders | |
|---|---|
| Unapproved Documents: | Select Yes/No if ExFlow should send emails if the approver have documents to approve |
| Discussion Panel: | Select Yes/No if ExFlow should send emails if the approver is mentioned in a Discussion Panel/Chat |
| Contract Invoice Reminder: | Select Yes/No if ExFlow should send emails if contract invoices is missing |
Both unapproved documents and unread comments will still show in ExFlow Web.
Business Central Notifications
If the ExFlow User is associated to a System User, notifications can be added in Business Central.
| Business Central Notifications | |
|---|---|
| Unapproved Documents: | Select Yes/No if ExFlow should show notifications for unapproved documents for the approver (System User) on the Role Center page |
| Discussion Panel: | Select Yes/No if ExFlow should show notifications for mentions in a Discussion Panel/Chat for the approver (System User) on the Role Center page |
| Contract Invoice Reminder: | Select Yes/No if ExFlow should send notifications if contract invoices is missing |
Learn more about Notifications under section Approval Workflow --> Notifications in Business Central.
ExFlow User Card - Permissions
Go to: ExFlow User Card --> Permissions
| Permission Menu | |
|---|---|
| New Line | Add a new line |
| Delete Line | Delete the line (only applicable to delete if no records exist) |
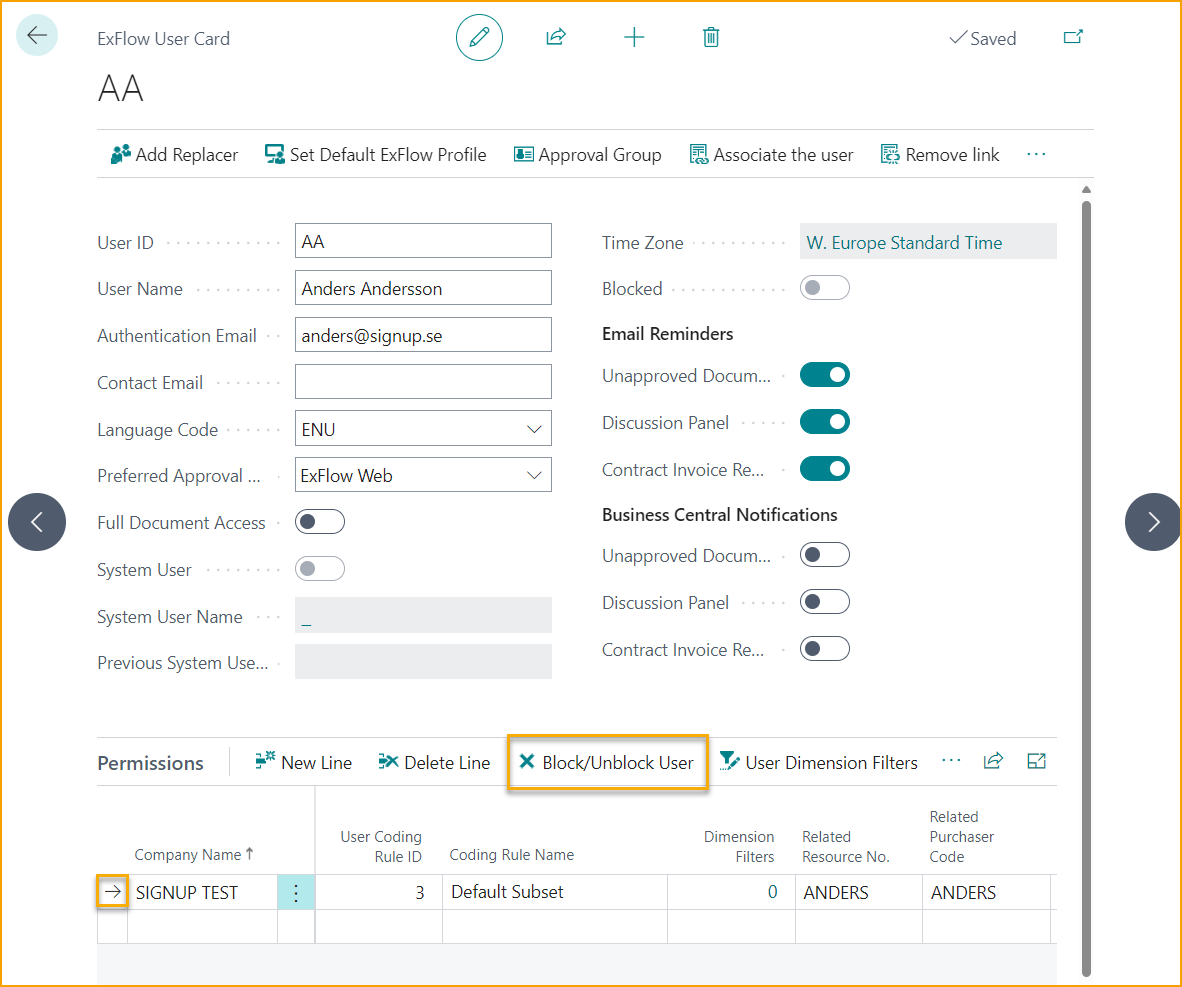
| Block/Unblock User | Block or Unblock an ExFlow User. An active ExFlow user with history (records) cannot be deleted, only replaced. Read more about this here |
| User Dimension Filters | Add dimensions to the ExFlow User |
| Import Journal Permission for Purchaser | Give a purchaser access to an journal. Read more about this under here |
Add company access and web permission role under Permissions
Specify the ExFlow User Permission under ''Permissions''.
| Permissions | |
|---|---|
| Company Name: | Add company from list that user should have access to. To be able to tag an approver the user needs to have access to the company document is created in |
| Web Permission Role: | All ExFlow Users need a Web User Permission role for ExFlow Web. Permission set on the ExFlow user is for web permission only. ExFlow User that should administrate documents in ExFlow needs to be a System User to be able to open ExFlow Pages. Read more below how to Create a System User Approver: Approver can Approve, Reject, or set a document On Hold The approver has only access to documents where approver is included in approval flow. No changes are allowed Approver (Power): Same permission as Approver. Add and Forward to other Approver. Adding or changing in coding is allowed i.e., G/L Account or Dimensions Approver (Super): Same permission as Power User. See all approved documents in ExFlow History Admin: Admin permission in ExFlow Web. This user can do settings that applies for all Approvers in ExFlow Web. Read more about this under section Web User Permissions |
| User Coding Rule ID: | If an Approver should be able to do changes in coding on document line in ExFlow Web, ExFlow User Coding Rules can be used to decide/restrict what values he/she can select. All Approvers need a Coding Rule Read more about this under section Business Functionality --> User Coding Rules |
| Related Resource No.: | It is possible to connect a Resource with an ExFlow user, to add a specific Approver automatically from "Person Responsible" on Project Read more under section Business Functionality --> Dynamic Approval Flow for Projects |
| Related Purchaser Code: | Add Purchaser to send reminder if Purchase Receipts is missing. This also requires ExFlow Email Setup. Or to build the approval rule based on Purchaser |
| Dimension Filter: | Will extend the Approvers Permission to see history in Search on ExFlow Web Approver will be able to see all documents with this dimension value included |
| Replaced by User: | If Approver is blocked. Read more under Approver Leaving the Company |
| Max Amount for Final Approval: | Specifies the max approval amount for the selected Approver. Only applicable when the User is the last approver in an approval flow |
| Blocked: | If Approver is blocked. Read more under Approver Leaving the Company. |
| Access to Confidential Documents | Specifies if the user have access to see Confidential Documents or not. Read more under Confidential Documents. |
| Check Email Setup | Enable a check on the Email Setup. If enabled, a notification will be shown in the Role Center (in the default company) for the associated System User when the Email Setup/Account is missing, for costumer using security groups. This feature provides a performance improvement for customers using security groups. |
Add Default Setup for ExFlow Users
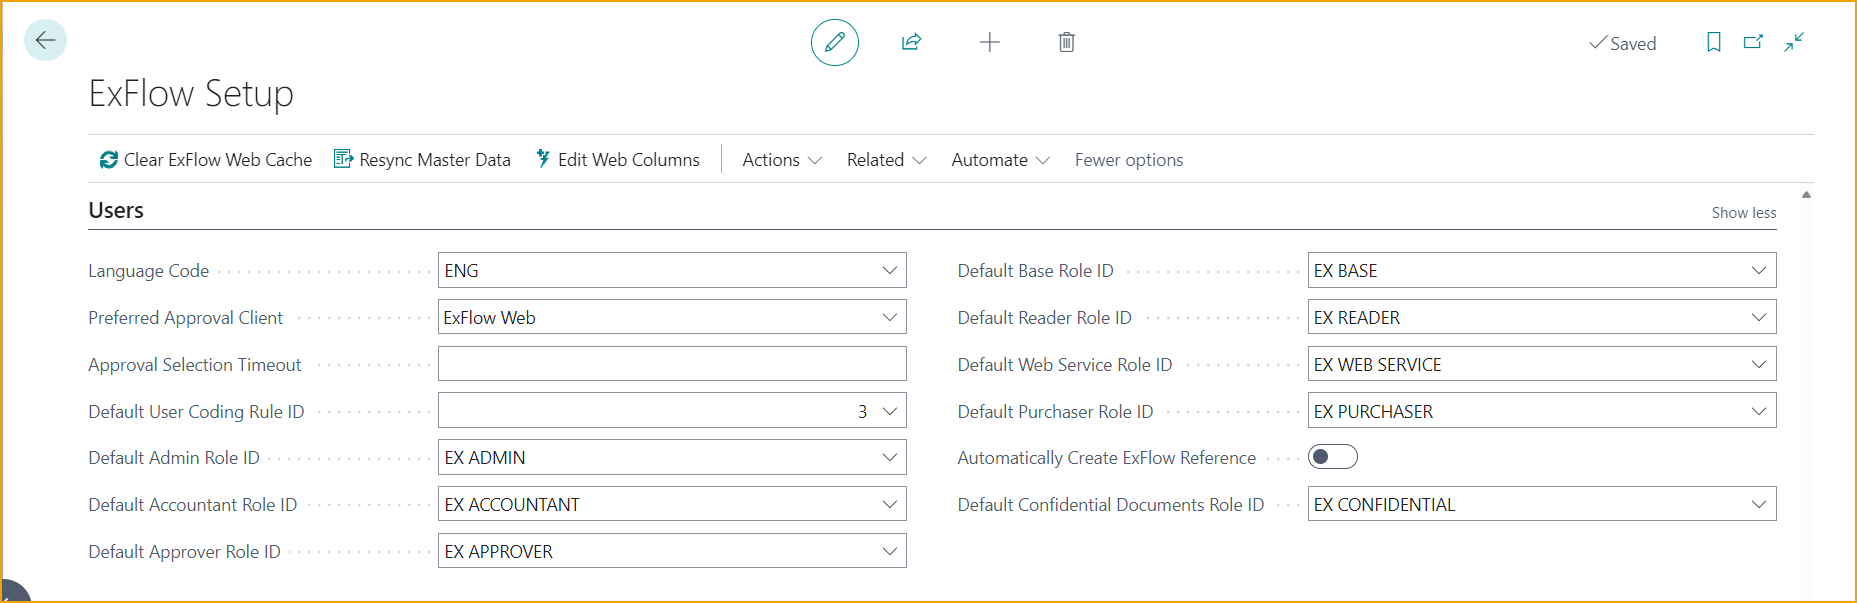
Go to: ExFlow Setup - Overview --> ExFlow Setup --> Users
Permission sets are added as default under the ''Users'' section in ExFlow Setup.
Other default settings for the ExFlow users can be specified in ExFlow Setup, such as: Default Language Code, Preferred Approval Client or/and a Default User Coding Rule ID.
Add a “Default User Coding Rule ID”, to make the setup of a new ExFlow User easier. By setting a “Default User Coding Rule” here, it will be populated when adding a new ExFlow User Permission line on Company level on the ExFlow User Card --> Permissions.
| ExFlow Setup - Users | |
|---|---|
| Language Code: | Add language code for emails sent to ExFlow approvers |
| Preferred Approval Client: | Specifies if the standard hyperlink in the emails for Reminders and Messages will take the user to Business Central or ExFlow Web |
| Approval Selection Timeout | Specifies the timeout used for approval selection |
| Default User Coding Rule ID | Specifies the default security role that is used when creating new approvers |
| Default Admin Role ID | Specifies the default security role that is used when creating new approvers |
| Default Accountant Role ID | Specifies the default security role that is used when creating new approvers |
| Default Approver Role ID | Specifies the default security role that is used when creating new approvers |
| Default Base Role ID | Specifies the default security role that is used when creating new approvers |
| Default Reader Role ID | Specifies the default security role that is used when creating new approvers |
| Default Web Service Role ID | Specifies the default security role that is used when creating new approvers |
| Default Purchaser Role ID | Specifies the default security role that is used when creating new approvers |
| Automatically Create ExFlow Reference: | Select to automatically create ExFlow References. Read more under section Reference Codes |
| Default Confidential Role ID | Specifies the default security role that is used when creating new approvers Read more about permissions under section Permissions on a Business Central user |
ExFlow User Scenarios
Add a Replacer During Vacation Time
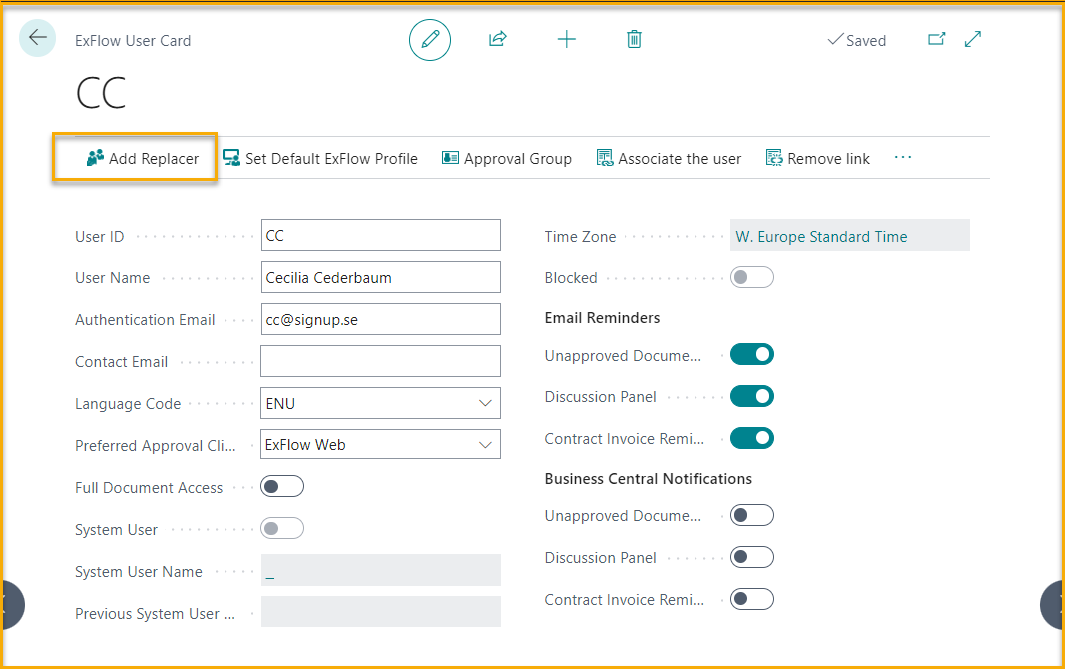
Go To: ExFlow Setup - Overview --> ExFlow Users (list) or via ''ExFlow User (card)''
When a user is absent or on holiday a replacer can be assigned who can handle his/hers documents.
Click "Add Replacer".
A user can be replaced in a single company or all companies, but only if the replacer have access to the company. The field ''All companies'' is enabled per default, but if the approver only should be replaced in one specific company, then select that company in the Company- field. The ''All Companies''- field will then be un ticked.
Next step is to add the Replacer for the Approver, in the ''Replacer''- field.
Remember to always set a start date and an end date.
Click on "Add Replacer" when all information is filled in.
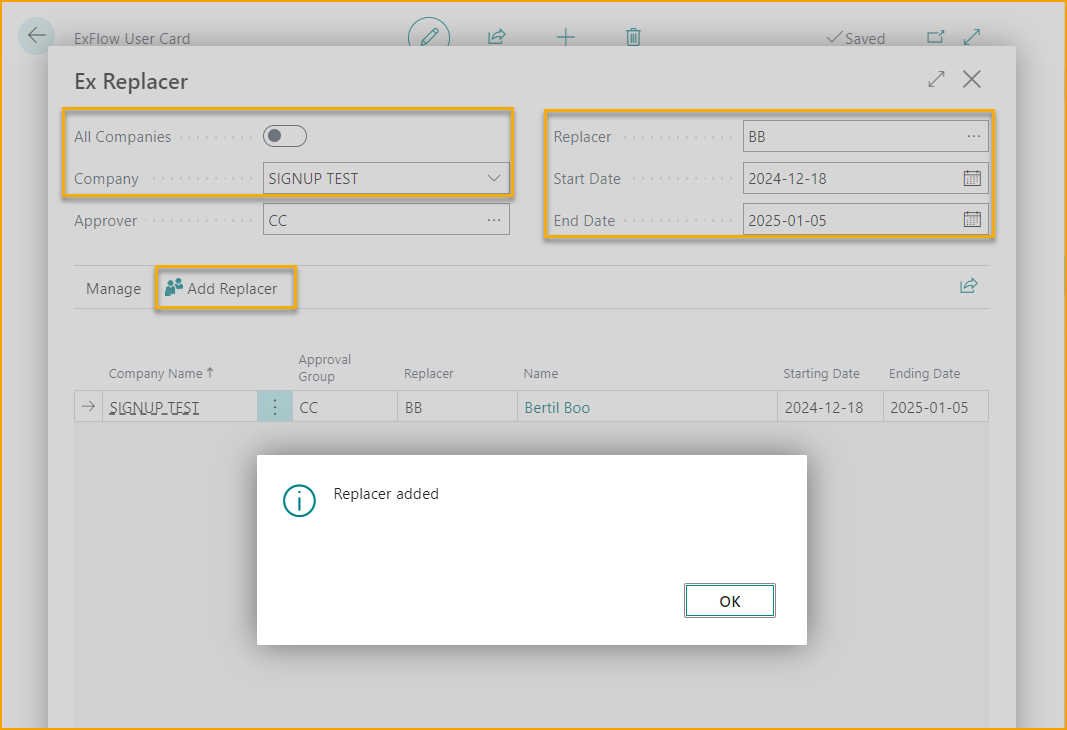
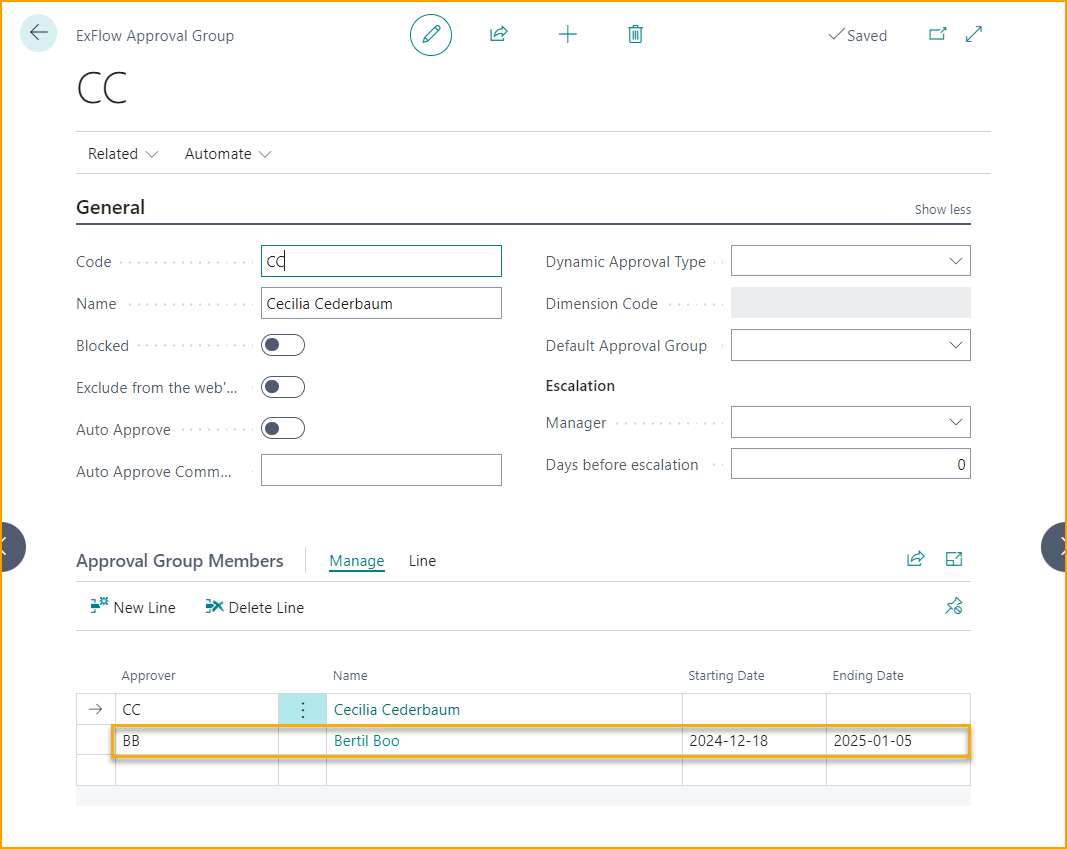
The replacer is now added into the Approvers Approval Group. The replaced user can still approve even if there is a replacer in place. Both can approve. Both will receive email notifications.
Approver Leaving the Company
Go To: ExFlow Setup - Overview --> ExFlow User
Select the user that is leaving.
Choose one company at a time and click on "Block/Unblock User".
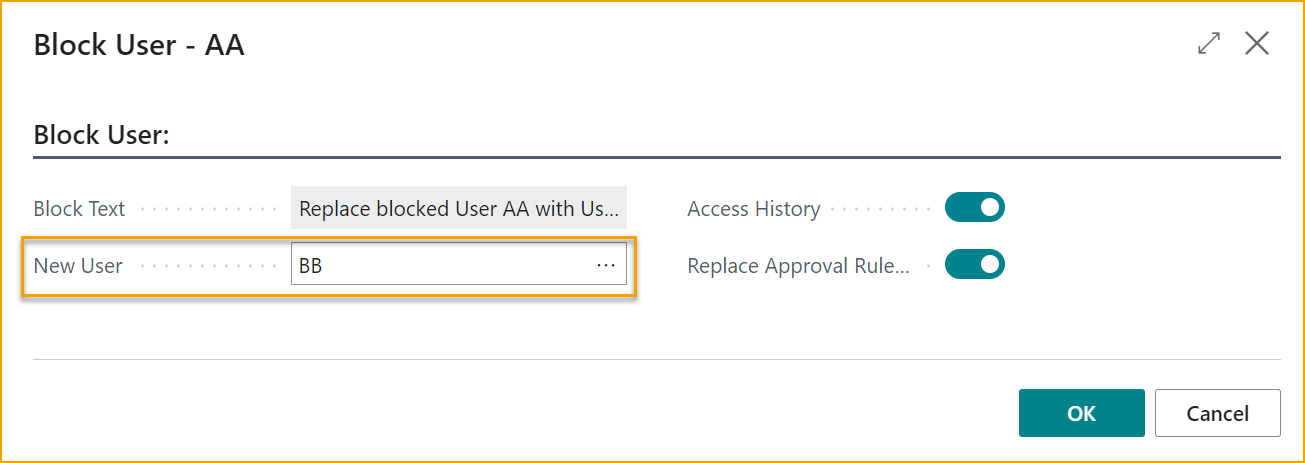
When blocking the user, add a replacer in the "New User" field. This updates the documents in the approval workflows.
Select the checkbox "Replace History" to give the new user access to the blocked users historical documents.
If the document is unapproved in Approval Status, then the blocked user will be automatically ''Approved'' under the ''Doc. Line Approvers'', along with the comment ''Approved because user was blocked.''. The replacer will be added automatically, as the current user instead of the blocked user.
For approved, but not yet posted documents, the replacer will be added into the ''Doc. Line Approvers'' along with the comment ''Added because of history replacement''.
In ExFlow Approval Status History, the replacer will be added into the Posted Document Line Approvers, along with the comment ''AA replaced by BB''.
Select the "Replace Approval Rule and Coding Rules" to automatically replace the blocked user in all existing rules. Or create/change in Approvals and rules manually according to the situation.
When the ExFlow User is blocked in all companies, User Card will automatically be Blocked and hidden from ExFlow User List.
Administrators can view hidden Blocked Users with function "View/Hide Blocked".
To see who is replacing the blocked user open ExFlow User Card.
Changing ExFlow User ID
If an (active) approver would like to change their ExFlow User ID, then their current ExFlow User needs to be blocked and replaced with a new ExFlow User with the new User ID.
In these cases, read more and follow the steps under Approver Leaving the Company
Approver Who Left the Company, Returns
Go To: ExFlow Setup - Overview --> ExFlow User --> Permissions
To reinstate an approver who has been blocked, click View/Hide Blocked from the ExFLow User list to show all blocked users. Select User and click ''Block/Unblock User''.
Question will pop up: Do you want to unblock user XXX? Click "Yes" on the Unblock question.
The returned user must now manually be added in Approval- and Coding rules again if "Replace Approval Rule and Coding Rules" was used when blocking the user.
Create a System User
Go to: Business Central Standard User
ExFlow User can also be created from Business Central User, by using “Create ExFlow User”. Action can be reached from Business Central User card, or “Users” main page.

In Users page select one or multiple Users and click “Create ExFlow User”. This action opens a new page displaying a temporary table with the selected users presenting all the values that will be pulled and copied over to the ExFlow Users once completed.
The “ExFlow User Exists” column in the table shows whether the ExFlow User has already been created or not. All other values of all other remaining fields have been copied from Business Central User card but can be modified if necessary.

User Coding Rule ID will be added automatically on newly created ExFlow User card, depending on the value selected on “Default User Coding Rule ID” in ExFlow Setup.
Associate to ExFlow User
Go to: User Card --> Associate to ExFlow User
Business Central User will be associated automatically to ExFlow User as an System User. If an ExFlow User is created before the system user, then simply use ''Associate the user'' to connect to the system user with the ExFlow User. Or use ''Associate to ExFlow User'', from the Users list.
It is possible to associate system user with the ExFlow user on the ExFlow User Card as well.
Permissions on a Business Central user
User Permission Sets automatically will be updated on User card for the newly created ExFlow Users.
Depending on what Role or Web permission Role they’ve specified, the Business Central User will be updated with EX ADMIN or EX APPROVER.
Here are all available ExFlow Permissions Set to use on the system user:
| Permission set | |
|---|---|
| EX BASE | Permission set that is granted automatically when installing ExFlow, this is needed to be able to access pages and cards that have ExFlow functionality in them (such as Purchase Order, Purchase Quote etc) |
| EX ADMIN | Full access to all tables and pages for ExFlow. |
| EX ACCOUNTANT | Limited access to pages. No access to setup pages (except re-invoicing pages). Can administrate ExFlow Users. |
| EX READER | Same as EX BASE but with only read permission. |
| EX APPROVER | Access to ExFlow Search and ExFlow Approval Documents. Used for approving invoices within Business Central. |
| EX PURCHASER | Access to use functions related to ExFlow on Purchase Orders and Quotes, such as adding approvers, changing approval flow. Also access to ExFlow Order/Quote Status. |
| EX WEB SERVICE | Used for the web and is assigned automatically when creating the Application from ExFlow setup. Needed only for ExFlow Web and Importing documents through web service. |
| EX CONFIDENTIAL | Used for handling confidential documents. |